Similar to its predecessors, low disk space on the C drive remains a common issue in Windows Server 2022/2025. When this occurs, you can clean up the C drive to reclaim valuable storage. Removing temporary logs, caches, and unnecessary junk files can safely free up space on your system volume. To achieve this, you can utilize either the built-in Disk Cleanup utility or specialized third-party software, though the native Windows utility is fully sufficient to accomplish this task. This article explains how to run Disk Cleanup in Windows Server 2022/2025 to optimize your C drive. If you cannot reclaim enough space through file deletion, it is highly recommended to allocate additional space to the C drive from another partition on the same disk.
1. Run Disk Cleanup in Windows Server 2022/2025 via GUI
There are two standard methods to launch the Disk Cleanup utility in Windows Server 2022/2025:
- Open File Explorer, right-click the C drive, and select "Properties". In the pop-up dialog box, click the Disk Cleanup button.
- Press the Windows key + R on your keyboard to open the Run dialog, type cleanmgr, and press Enter. The C drive is selected by default, so you can click "OK" to proceed.
Both approaches will open the exact same optimization window.
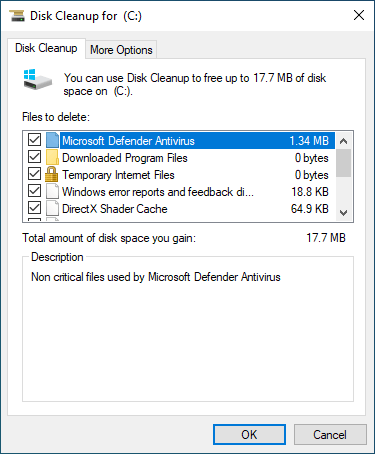
How to clean up C drive in Server 2022 with Disk Cleanup tool:
- Select the checkboxes next to the files you want to delete, then click "OK".
![Disk Cleanup]()
- Click "Delete Files" in the next dialog box to confirm and start deleting.
2. Clean Up C Drive in Windows Server 2022/2025 via Command-Line
If you want to run Disk Cleanup in Windows Server 2022 via command, follow the steps below.
Way 1: Automatically Select All Files With Manual Confirmation
- Press the Windows key + R simultaneously to open the Run dialog box.
- Type cleanmgr /LOWDISK and press Enter.
- The Disk Cleanup dialog box will appear with all file categories selected by default, allowing you to simply click "OK" to confirm.
Way 2: Automatically Clean Up All Junk Files
- Press the Windows key + R simultaneously on your keyboard.
- Type cleanmgr /VERYLOWDISK and press Enter.
Disk Cleanup will automatically delete all junk files and then display a dialog box showing the results.
Way 3: Automatically Clean Up Specified Junk Files
- Press the Windows key + R simultaneously on your keyboard to open the Run dialog box.
- Type cleanmgr /sageset:1 and press Enter. (You can specify any index value from 0 to 65535).
- When the Disk Cleanup dialog box appears, select the specific file types you want to delete and click "OK" to save the configuration.
- To execute the cleanup, press the Windows key + R simultaneously, type cleanmgr /sagerun:1, and press Enter. The preselected junk files will then be deleted silently without a results window.
In the future, you only need to run cleanmgr /sagerun:1 to clear these files. If you want to manage a different selection of files, type cleanmgr /sageset:2 in step 2 and run cleanmgr /sagerun:2 in step 4.
3. Extend the C Drive if You Cannot Reclaim Sufficient Space
If you have never freed up disk space before, you may reclaim over 10GB of capacity on the C drive. However, this is rarely sufficient for long-term server maintenance. New junk files continuously accumulate on the C drive, quickly consuming the newly released space. To prevent the C drive from filling up again in the near future, it is highly recommended to allocate more space from another partition.
By utilizing safe disk partition software, you can shrink another volume on the same disk. This operation releases free space and converts it into unallocated space. You can then merge this unallocated space into the C drive to significantly increase its available capacity. To ensure maximum data protection, NIUBI Partition Editor features Virtual Mode, Cancel-at-will, 1-Second Rollback, and Hot-Clone technologies to safeguard your system and data. This allows you to transfer free space to the C drive with zero data loss. All files, applications, and system configurations remain completely intact, with only the partition sizes being adjusted.
Download NIUBI Partition Editor and watch the video tutorial below to extend the C drive safely.
Beyond resizing and extending partitions in Windows Server 2022/2025 and legacy versions from Server 2003 to 2019, NIUBI Partition Editor provides a comprehensive toolkit to clone, merge, convert, wipe, and hide partitions, as well as optimize file systems and scan for bad sectors.
It is highly recommended to expand the C drive as much as your disk capacity allows. To maintain optimal server health, consider the following two additional suggestions:
- Avoid installing all applications onto the C drive, and redirect the default download and program output paths to a different partition.
- Run the built-in Disk Cleanup utility in Windows Server 2022/2025 on a monthly basis to regularly remove newly generated junk files.