Whether you are using a high-speed SSD or a traditional mechanical HDD, any storage device will eventually approach full capacity. When the C drive or another partition runs out of space, you can easily extend it by allocating free space from another volume on the same disk. However, when the entire disk becomes full, a different strategy is required. While backing up everything and restoring it to a new drive is possible, it is incredibly time-consuming. A much more efficient approach is to clone the disk directly to a larger one. This article explains how to clone a Windows Server 2022/2025 disk to an SSD, a larger or smaller HDD, or a hardware RAID array seamlessly.
How to Clone a Windows Server 2022 Disk
There are numerous disk cloning software options available for Windows Server 2022/2025, but their underlying capabilities and performance vary significantly. Some utilities rely on slow, sector-by-sector cloning, whereas others utilize efficient file-system-level copying. Furthermore, while certain tools can execute cloning directly within the OS, others require a disruptive server reboot or can only operate via a bootable USB drive. Resizing flexibility is another major differentiator; many programs can only duplicate volumes at their original sizes, while advanced solutions allow you to resize partitions to fit the target disk's capacity. When it comes to cloning disks in Windows Server 2022/2025, NIUBI Partition Editor stands out as the premier choice, offering several distinct advantages:
- It utilizes file-system-level cloning, making the process significantly faster than traditional sector-by-sector duplication.
- It features a unique file-moving algorithm that accelerates partition resizing, moving, and cloning by an additional 30% to 300%.
- It incorporates Hot-Clone technology, enabling you to clone disks directly within Windows without requiring a server reboot, ensuring zero downtime.
- It can automatically adjust partition sizes during the process, allowing you to clone a disk to an equal, larger, or even smaller drive (provided the total used space across all source partitions is less than the capacity of the target disk).
- Beyond disk and partition cloning, it delivers a comprehensive suite of advanced partition management operations to completely optimize your storage infrastructure.
After downloading and launching the tool, you will see the main window, which is neatly divided into five distinct sections:
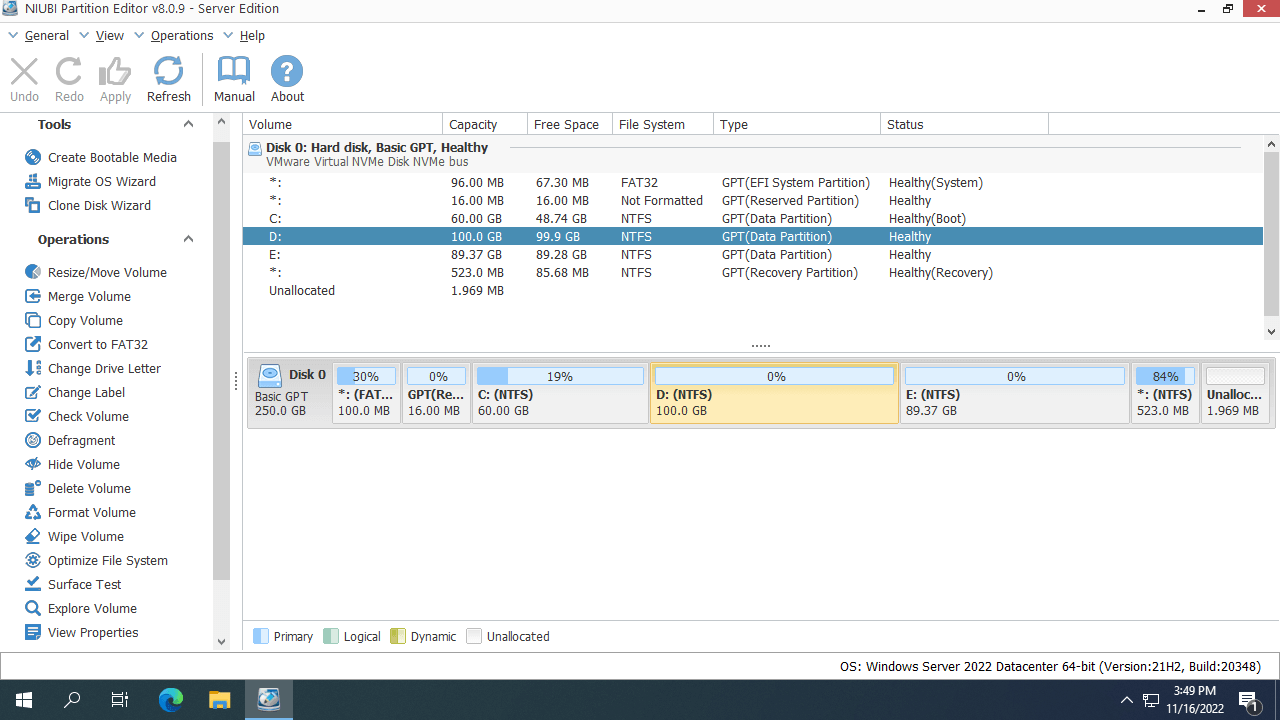
- Partition List: Displays all individual volumes along with their detailed parameters.
- Disk Layout: Shows a graphical structure of all physical, virtual, and RAID array disks.
- Action Panel: Lists available operations for the selected disk or partition (unavailable options are automatically hidden to ensure a clean workflow).
- Pending Operations: Queues all actions in Virtual Mode before execution.
- Execution Bar: Provides quick-access buttons to cancel, redo, or apply pending operations.
How to clone a disk in Windows Server 2022 to an SSD/HDD/RAID:
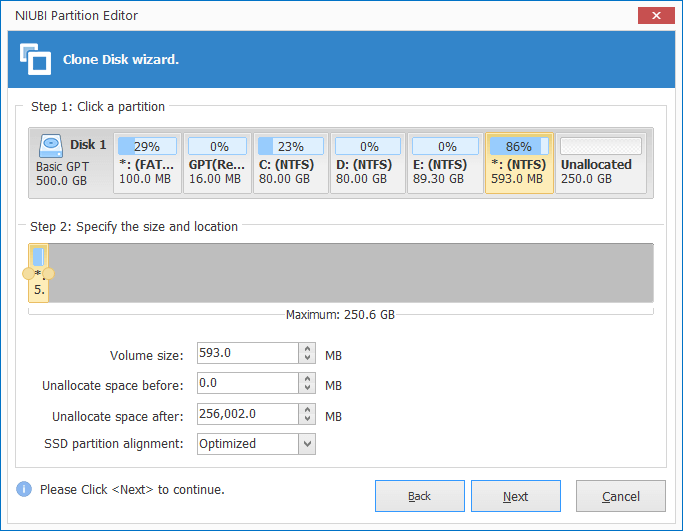
- Right-click the front area of the source disk and select "Clone Disk", or click "Clone Disk Wizard" in the top-left corner.
- Select the destination disk in the pop-up window. If there are existing partitions on the target disk, you will be prompted to delete them. You can only proceed with the cloning process after selecting the option to clear these partitions.
- Edit the size and location of the partitions on the destination disk. Start from the last partition. Drag either border of a partition to shrink or extend it. To move the entire partition, drag its middle section into the adjacent unallocated space.
![Clone Disk Layout Adjustment]()
- Click "Next" and confirm your configurations in the following window. Finally, click "Apply" in the top-left corner to execute the pending operations.
Watch the video tutorial below to see the exact steps for cloning Windows Server 2022/2025 disk partitions:
How to Copy a Partition in Windows Server 2022
When copying a partition in Windows Server 2022/2025, there must also be unallocated space on the destination disk. If no such space is available, you can easily shrink an existing partition to create it using NIUBI Partition Editor. Simply right-click a large partition on the destination disk, select "Resize/Move Volume", and drag either border inward within the pop-up window.
How to copy a volume in Windows Server 2022/2025 using NIUBI Partition Editor:
- Right-click the source partition and select "Copy Volume".
- Select the unallocated space on the destination disk and click "Next".
- If there are programs installed on the source partition, you will likely want the new partition to retain the original drive letter. To do this, change the drive letter of the source partition first, which frees up the original letter so it can be assigned to the new destination partition.
- Click "Apply" in the top-left corner to execute the pending operations.
Beyond copying and cloning partitions, NIUBI Partition Editor provides a comprehensive set of disk management tools for Windows Server 2022/2025 and legacy versions from 2008 to 2019. You can easily shrink, extend, move, merge, convert, defragment, hide, and wipe partitions, as well as scan for bad sectors.